
How to apply an effect to images and convert them to another format?
- Introduction
- Step 1: Download and install Soft4Boost Image Converter
- Step 2: Run Soft4Boost Image Converter and select your input files
- Step 3: Switch to the Corrections tab and select an effect
- Step 4: Select output format
- Step 5: Set output parameters
- Step 6: Convert your images
Sometimes you might need to correct a set of photos or create a collection of stylized pictures and then convert all of them to another format to be able to post your images on the web, for instance. You can perform this monotonous task quickly and easily if you use our Soft4Boost Image Converter. It enables you to apply one and the same effect to several images and perform batch conversion of the image files to Jpeg, Png, Bmp, Gif, Tiff, Ras, Tga, Pdf formats. Please follow the steps listed below.
Step 1: Download and install Soft4Boost Image Converter
Click here to download it. After the download is finished, run the S4BImageConverter.exe file and follow the installation wizard instructions.
Step 2: Run Soft4Boost Image Converter and select your input files
First of all run Soft4Boost Image Converter. To do that find the corresponding program icon on your desktop and double-click it. If you unchecked the Create desktop icon box during the installation, you can run the program from the Start menu. Please follow Start > All Programs > Soft4Boost > Image Converter.
To load image files you would like to convert click the Add button on the Toolbar. You will be able to load a series of images stored on your computer HDD.
To load a folder with images stored on your computer HDD click the black arrow next to the Add button and select the Add Folder option.
In the opened Windows Explorer window select the necessary image files or the folder with images and click the Open button to load them to the program.
Step 3: Switch to the Corrections tab and select an effect
To apply an effect to your images you would need to switch to the Corrections tab. All available adjustments and effects will be displayed in the Working Area of the Corrections tab located on the left.
At first you can apply automatic adjustments to your images by pressing the Auto Corrections button. The brightness, contrast and temperature of your images will be automatically corrected. If you want to return to the original image parameters press the Reset All Corrections button.
It is also possible to adjust the Brightness, Contrast, Temperature and Blur / Sharpen parameters separately. Use the corresponding sliders to correct the needed parameter manually or press the Auto Brightness, Auto Contrast or Auto Temperature button to adjust it automatically. To cancel the separate parameter correction click the appropriate Reset to Default button.
Finally, you can select one of the available predetermined effects from the Effect drop-down list or choose an image texture from the Mask drop-down list. To discard these changes you can select the Original Photo effect or the None mask respectively.
To undo all the changes you made use the Reset All Corrections button.
You can view the result while editing in the Preview Area. Use the Navigation Panel placed below the Preview window to view all the images with the applied effect.
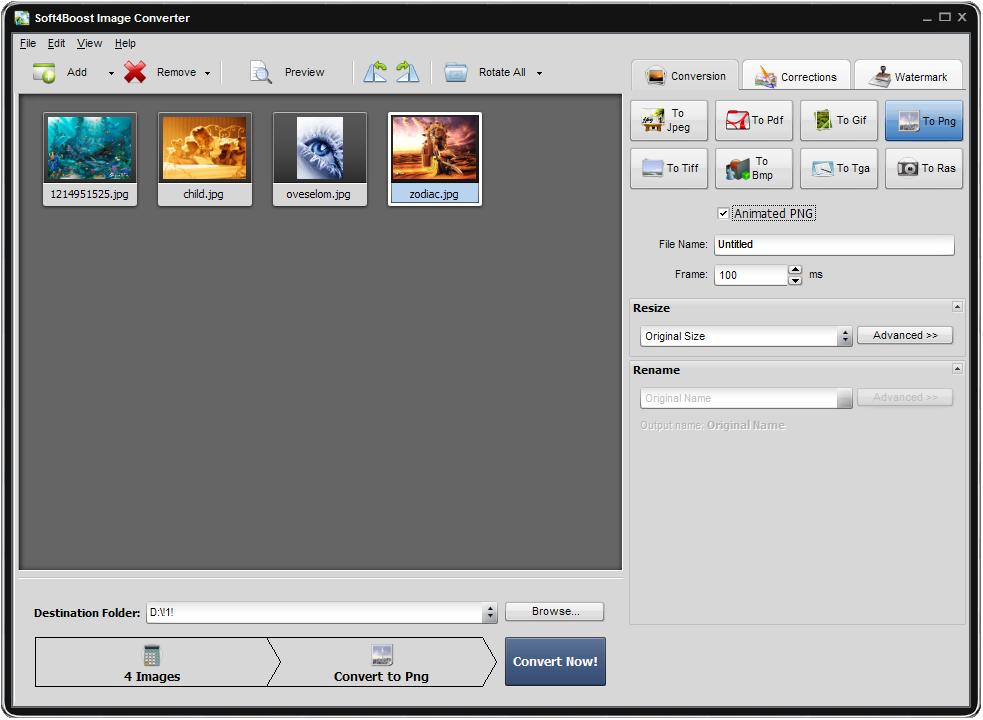
Return to the Conversion tab. Select output format by pressing the appropriate button in the Working Area of this tab. Adjust settings of the format if available.
If you want to resize your images you can perform this task at the Conversion tab using the Resize section and selecting the desired preset from the drop-down list. You can click the Advanced >> button to manually set a particular size.
You can also change output name in the Rename section of the Conversion tab.
Then set output folder for the resulting files. To do that select one of the folders from the Destination Folder drop-down list. If you want to specify your own folder press the Browse... button. In the opened window browse for the desired directory and press the OK button.
Click the Convert Now! button to start the conversion process. When the conversion is over open the folder containing new images of the desired format and use them according to your needs. That's all! The edited images of a new format are ready. So a great deal of pictures can be processed within the minimal time.